Tuesday, 26 August 2014

Hacking Traffic Lights is Amazingly Really Easy


Hacking Traffic Lights is Amazingly Really Easy
Hacking Internet of Things (IoTs) have become an amazing practice for cyber criminals out there, but messing with Traffic lights would be something more crazy for them.

The hacking scenes in hollywood movies has just been a source of entertainment for the technology industry, like we've seen traffic lights hacked in Die Hard and The Italian Job, but these movies always inspire hackers to perform similar hacking attacks in day-to-day life.

Security researchers at the University of Michigan have not only hacked traffic light signals in real life, but also claimed that it’s actually shockingly easy to perform by anyone with a laptop and the right kind of radio. If we compare the traffic light hacks in movies and real life, the reality is much easier.

In a paper study published this month, the security researchers describe how a series of major security vulnerabilities in traffic light systems allowed them to very easily and very quickly seized control of the whole system of at least 100 traffic signals in an unnamed Michigan city from a single point of access.

Researchers took permission from a local road agency before performing the hack, but they did not disclose exactly where in Michigan they did their research.
‟Our attacks show that an adversary can control traffic infrastructure to cause disruption, degrade safety, or gain an unfair advantage,” the paper explained.

SECURITY HOLES IN TRAFFIC LIGHT SYSTEMS

The team, led by University of Michigan computer scientist J. Alex Halderman, said that the networked traffic systems are left vulnerable to three major weaknesses:
  1. Unencrypted radio signals,
  2. The use of factory-default usernames and passwords, and
  3. A debugging port that is easy to attack
This left the network accessible to everyone from cyber criminals to young hackers.
traffic light hacking
“The vulnerabilities we discover in the infrastructure are not a fault of any one device or design choice, but rather show a systemic lack of security consciousness,” the researchers report in a paper.
In an effort to save on installation costs and increase flexibility, the traffic light system makes use of wireless radio signals rather than dedicated physical networking links for its communication infrastructure - this hole was exploited by the researchers. Surprisingly, more than 40 states currently use such systems to keep traffic flowing as efficiently as possible.
“The safety critical nature of traffic infrastructure requires that it be secure against computer-based attacks, but this is not always the case,” the team said. “We investigate a networked traffic signal system currently deployed in the United States and discover a number of security flaws that exist due to systemic failures by the designers. We leveraged these flaws to create attacks which gain control of the system, and we successfully demonstrate them on the deployment.”

WIRELESS SECURITY IN QUESTIONS

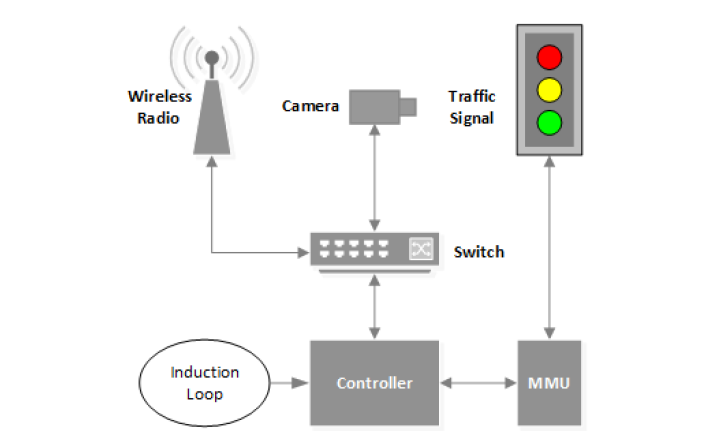
The Traffic light systems use a combination of 5.8GHz and 900MHz radio signals, depending on the conditions at each intersection, for wireless communication in point-to-point or point-to-multipoint configurations. The 900MHz links use "a proprietary protocol with frequency hopping spread-spectrum (FHSS)," but the 5.8GHz version of the proprietary protocol isn't terribly different from 802.11n.

The researchers says that anyone with a laptop and a wireless card operating on the same frequency as the wirelessly networked traffic light — in this case, 5.8 gigahertz — could access the entire unencrypted network.

DEBUG PORT

Now, after gaining access, next was to communicate with one of the controllers in their target network. This was done very easily due to the fact that this system’s the control boxes run VxWorks 5.5, a version which by default gets built from source with a debug port left accessible for testing.
“By sniffing packets sent between the controller and this program, we discovered that communication to the controller is not encrypted, requires no authentication, and is replayable. Using this information, we were then able to reverse engineer parts of the communication structure,” the paper reads.
“Various command packets only differ in the last byte, allowing an attacker to easily determine remaining commands once one has been discovered. We created a program that allows a user to activate any button on the controller and then displays the results to the user. We also created a library of commands which enable scriptable attacks. We tested this code in the field and were able to access the controller remotely.”
This debug port allowed researchers to successfully turned all lights red or alter the timing of neighboring intersections — for example, to make sure someone hit all green lights on a given route.

More worrying part is the ability of a cyber criminal to perform denial-of-service (DoS) attack on controlled intersections by triggering each intersection’s malfunction management unit by attempting invalid configurations, which would put the lights into a failure mode.

SOLUTION TO PROBLEM

At last, the team called for manufacturers and operators to improve the security of traffic infrastructure. It recommended that the traffic-system administrators should not use default usernames and passwords, as well as they should stop broadcasting communications unencrypted for “casual observers and curious teenagers” to see.
"While traffic control systems may be built to fail into a safe state, we have shown that they are not safe from attacks by a determined adversary," the paper concluded.
Moreover, they also warned that devices like voting machines and even connected cars could suffer similar attacks.

If you like our post or have any suggestion or got stuck at any steps implementing the widget to your blog then leave a comment below i will be glad to help you out. Subscribe to our blog, Like us on Facebook, +1 on Google+. Keep Blogging!

Monday, 28 July 2014

Secure yout account from a new facebook virus !!

A new Facebook virus has infected more than 50K users.....are you one of them ??

new facebook virus

Facebook viruses have been around for a while, but lately I’ve seen them cropping up even more frequently. You get a Facebook virus when you click on a link that installs malicious code or if you allow an untrusted application access to your account.

What to do if you too are infected from this virus ?

The first thing you have to do when you discover you have a Facebook virus is change your Facebook password.

Finally, check to be sure the application isn’t lurking on your account. It’s probably not, but it’s good to be sure and now is a good time to clean out the apps you’re not using any more anyway. To check the apps connected to your account, follow these instructions:

1) Go to Account > Privacy Settings.

2) Click the Edit your Settings link under Apps and Websites.


3)Click the top Edit Settings button (by Apps You Use).
The Apps You Use page comes up listing all the apps you’ve allowed to have access to your account.(Mostly the app is named Xperia or HTC)
Go through the list and be sure you know each and every one of the apps.
If you’re unsure if the app is trusted or if you want to remove an app.

new facebook virus
 4) Click the Edit Settings button next to the app.

new facebook virus
5) Click the Remove the app.

6) Thats it and you are safe now. :)
If you like our post or have any suggestion or got stuck at any steps implementing the widget to your blog then leave a comment below i will be glad to help you out. Subscribe to our blog, Like us on Facebook, +1 on Google+. Keep Blogging!

Wednesday, 11 June 2014

Create Bootable USB Without Any Software in windows 7

Assalam-O-Alaikum

Here is a tutorial to create Bootable USB Drive in window's  without any software...
By this you can install window's 7 without CD....

Am also share this tut in URDU.. So Lets start................................

Requirements :

1. 4Gb USB Drive
2. Window's  CD

Step 1) Insert win7 CD and copy all data form it to an folder in your Hard Drive..

Step 2) Eject CD and put USB Drive

Step 3) Then open Start and search for   DISKPART ... A black window will be open
 Step 4) Then type "List Disk"  and hit Enter button.. and check your USB Drive 

Step 5) Then Type "Select Disk #"  in place of hash, type your USB drive no#

See In Urdu Language :  Picture :
Step 6) Then type After DISKPART>  Clean

Step 7) Then type " Create Partition Primary"  and Hit Enter...

Step 8) Then type " Format fs=fat32 quick"   and hit Enter button, your usb starts formatting...

Step 9) Then type after DISKPART>  assign    and hit Enter... A autorun page will be open.. close it..

Step 10) Type  Exit..  and copy all that files which was copy from Win7 CD  in Step1 in your USB drive ...

 See in Urdu :
Enjoy 
If you like our post or have any suggestion or got stuck at any steps implementing the widget to your blog then leave a comment below i will be glad to help you out. Subscribe to our blog, Like us on Facebook, +1 on Google+. Keep Blogging!

Shutdown Your Window's 7 in just 2 seconds

Assalam-O-Alaikum
Today i am telling about you to shutdown your windows 7 in just 2 seconds. This is amazing and to easy trick and many friends don't know about this trick....
Lets start!
Step 1) Press Alt+Ctrl+Del  button..  The below screen will be show ...
Step 2) Hold Ctrl button & Click on Shutdown option ...  Then Your Window will be Shutdown in just 2 seconds
Enjoy!
If you like our post or have any suggestion or got stuck at any steps implementing the widget to your blog then leave a comment below i will be glad to help you out. Subscribe to our blog, Like us on Facebook, +1 on Google+. Keep Blogging!

Avoid Your Computer From Hanging Problem

Assalam-O-Alaikum

So Many Peoples are worried due to Computer hanging . Today i am going to share an amazing Trick which help to solve this problem. So lets start!!!!!!

Step 1) Open Run & type "msconfig"  and hit Enter button...
Avoid Your Computer From Hanging Problem
Step 2) The blow window will be shown. Then click on services tab..
Avoid Your Computer From Hanging Problem
Step 3) Uncheck the "Background Intligent Transfer" & click on  OK & Restart your PC.

Enjoy!

If you like our post or have any suggestion or got stuck at any steps implementing the widget to your blog then leave a comment below i will be glad to help you out. Subscribe to our blog, Like us on Facebook, +1 on Google+. Keep Blogging!

Create Un Deleteable or Un Rename able Folder

Assalam-O-Alaikum
Here is a Trick for creating un deleteable or un Renameable folder..
Step 1) Open Run and Type CMD and hit Enter button..
Create Un Deleteable or Un Rename able Folder

Step 2) Type these commands in command prompt..
cd\
D:
Create Un Deleteable or Un Rename able Folder
Step 3) Type command  "md con"  and press Enter..
Create Un Deleteable or Un Rename able Folder
Now close command prompt and open that drive in which you have created this CON folder... This folder could not be deleted or Renamed !!!!!!!!!!!!!
Enjoy !
If you like our post or have any suggestion or got stuck at any steps implementing the widget to your blog then leave a comment below i will be glad to help you out. Subscribe to our blog, Like us on Facebook, +1 on Google+. Keep Blogging!

Remove Write Protected Error from Memory Card or USB , Flash Drive

Assalam-O-Alaikum
So many friends ask about Write protected Error.. Today am going to share Easy Trick to Fix "Write Protected Error" form HDD or MMC..

Lets Start !!!!!!!!!!!!!!!1

Step 1) Open RUN and Type  regedit.exe  and press Enter button..
Remove Write Protected Error from Memory Card or USB , Flash Drive
The Blow window will be shown :
Remove Write Protected Error from Memory Card or USB , Flash Drive
Step 2) Go to path  HKEY_LOCAL_MACHINE>SYSTEM>CURRENT>CONTROL>STORAGEDEVICEPOLECIES

and click on Storagedevicepolecies  and change value 1 to 0

See Pics :
Remove Write Protected Error from Memory Card or USB , Flash Drive

Remove Write Protected Error from Memory Card or USB , Flash Drive

Enjoy
If you like our post or have any suggestion or got stuck at any steps implementing the widget to your blog then leave a comment below i will be glad to help you out. Subscribe to our blog, Like us on Facebook, +1 on Google+. Keep Blogging!

Speedup PC without RAM by using USB

Guys Today am sharing a great trick which is very useful for every one..
With this trick you can Speedup your computer by using you extra usbs.. Now a days Every one have many usbs of different size, which are not using daily..
So we can Boostup our pc by using that usb in just simple steps...

Lets Start...................
Step 1) Take 2gb USB drive and insert in your CPU usb port....
Speedup PC without RAM by using USB
Step 2) When your PC detect your USB then go to that usb drives  properties and then click on ReadyBoost Tab...
Speedup PC without RAM by using USB

Step 3) Now check on "Use this Device" and click on OK..

Yuppeeee now you have done it....  now you are using your usb as a RAM...

If you like our post or have any suggestion or got stuck at any steps implementing the widget to your blog then leave a comment below i will be glad to help you out. Subscribe to our blog, Like us on Facebook, +1 on Google+. Keep Blogging!

Thursday, 22 May 2014

What is 3G and 4G technology in Urdu

What is 3G and 4G technology in Urdu

What is 3G and 4G technology in Urdu

What is 3G and 4G technology in Urdu

What is 3G and 4G technology in Urdu

What is 3G and 4G technology in Urdu

What is 3G and 4G technology in Urdu

If you like our post or have any suggestion or got stuck at any steps implementing the widget to your blog then leave a comment below i will be glad to help you out. Subscribe to our blog, Like us on Facebook, +1 on Google+. Keep Blogging!

Friday, 16 May 2014

U-Design v2.4.2 Free WordPress Theme (Latest Version)

Download U-Design v2.4.2 – Themeforest WordPress Theme (Latest Version)

U-Design v2.4.2 Free WordPress Theme (Latest Version)
U-Design is a very powerful theme which suits both, users with no programming background as well as advanced developers. It will help you build your site in no time to your liking with minimal effort. It empowers you to set any color to elements such as backgrounds, links, text, menu links, etc. You can completely change the look and feel of your site in seconds. You can also choose from over 500 fonts, including Google Font Directory and Cufón fonts. This number will grow with time since many new fonts are being added to the Google fonts library. The theme also features 6 (six) Home page sliders for you to choose from.

SEO (Search Engine Optimization) has been made a priority when designing the U-Design theme. In the code hierarchy, the main content block is placed before the sidebar regardless of the sidebar position, so it is crawled first by search engines. Another very powerful SEO feature has been implemented regarding Heading (h1, h2, h3,…) tags in that on the Home page the ‘h1’ tag is assigned to the site name and the rest of pages/posts/archives etc., the main Title has been assigned an ‘h1’ tag.

Responsive & Mobile Ready!!! U-Design theme has a fully responsive layout. It fits perfectly on various displays and resolutions from regular desktop screens to tablets,iPads,iPhones and small mobile devices. Feel free to try it out! The theme offers two responsive menus, additionally you have the option to assign a different logo to be used for the mobile version of your site and more. A note for those who do not require responsive layout, it is optional so they can disable it if they wish to.

Demo U-Design v2.4.2 – Themeforest WordPress Theme

Download U-Design v2.4.2 – Themeforest WordPress Theme

If you like our post or have any suggestion or got stuck at any steps implementing the widget to your blog then leave a comment below i will be glad to help you out. Subscribe to our blog, Like us on Facebook, +1 on Google+. Keep Blogging!

Avada v3.4 – Responsive Multi-Purpose Theme

Download Avada v3.3.1 – Themeforest Responsive Multi-Purpose Wordpress Theme Free Download

Avada v3.4 – Responsive Multi-Purpose Theme
Avada is so clean, super flexible and has a fully responsive design! This theme sets the new standard with endless possibilities, top-notch support, and free lifetime updates with newly requested features from our users. And its the most easy-to use theme on the market! Avada is very intuitive to use and completely ready to operate out of the box.

Built with HTML5 & CSS3, a lot of thought and care went into this theme making it a pleasure to use. Avada has a ton of incredible user reviews and lots of awesome features. We’ve highlighted some of our features below, check them out below! The clean design can be used for any type of website; business, corporate, portfolio, blog, products, etc. Come join the 50,000+ users and be a part of this awesome community!

Demo Avada v3.4 – Themeforest Responsive Multi-Purpose Theme


Download Avada v3.4 – Themeforest Responsive Multi-Purpose Theme


If you like our post or have any suggestion or got stuck at any steps implementing the widget to your blog then leave a comment below i will be glad to help you out. Subscribe to our blog, Like us on Facebook, +1 on Google+. Keep Blogging!

Jarida v2.1.1 – Responsive WordPress Theme (latest version)

Download Jarida v2.1.1 – Themeforest Responsive WordPress News, Magazine, Blog (latest version)

Jarida v2.1.1 – Responsive WordPress Theme (latest version)
Version 2.1.1 – 12-02-2014
 ========================================
- Improved: Compatible with the new WooCommerce plugin version 2.1+ ( After Update the plugin you need to re-add thw shop widgets in the shop sidebar ).
- Improved: Breaking News module position before loading the theme's js file.
- Fixed: Mega menu HTML bug.
- Fixed: vimeo video og image bug.
- Fixed: StumbleUpon post URL bug.
- Fixed: Appearance of content bug on Android browsers.
- And other improvements and minor bug fixes.

Version 2.1.0 - 03-02-2014 
========================================
- NEW FEATURE: Offset option in the Homepage boxes.
- NEW FEATURE: Compatible with the UberMenu plugin.
- Improved: Some RTL styling.
- Improved: woocommerce shop page sidebar position option.
- Improved: custom background and color options for Woocommerce shop page. 
- Fixed: Title bug in the Text or Html widget.
- Fixed: bbPress user profile bug.
- Fixed: Authors social icons in authors template page.
- Fixed: Submit button bug when jquery validation option set to ON .
- Fixed: Top navigation appearance and styling issues.
- Fixed: Mega menus styling bug in the Scrolling nav.
- Fixed: WPML bug in the Recent posts widget.
- Fixed: Elastic Slideshow overlay on main nav menu.
- Fixed: Stick Main Nav bug with Safari7 on Mac (beta).
- Fixed: Selective posts option in the main slider bug.
- And other improvements and minor bug fixes.

Demo Jarida v2.1.1 – Responsive WordPress Theme (latest version)


If you like our post or have any suggestion or got stuck at any steps implementing the widget to your blog then leave a comment below i will be glad to help you out. Subscribe to our blog, Like us on Facebook, +1 on Google+. Keep Blogging!

Prime Minister finally orders to ban ‪GeoTV‬.

Prime Minister finally orders to ban ‪GeoTV‬.
The Prime Minister of Azad Kashmir Chaudhry Abdul Majeed has ordered all cable operators in the state to immediately block the broadcast of Geo Television Network for committing alleged blasphemy.
PM Majeed, belonging to Pakistan Peoples Party (PPP) held a press conference on Friday in which he strongly lashed and criticized the Geo Television Network for their negative activities against state institutes and now religion.

“Geo is facing the wrath of its own sins. Geo has hurt religious sentiments of every Muslim. The television channel has been invloved in anti state activities since long. I demand government of Pakistan to immediately ban Geo in Pakistan as well,” he added while giving direct orders to all cable operators in Azad Kashmir to ban Geo in all state.

The already in troubled Geo Television Network had conferred with another grave accusation of blasphemy for allegedly insulting family of Holy Prophet Mohammed PBUH during the marriage drama of Veena Malik.

The religious cleric of all sects joined their voices against the ‘heinous’ act by the Geo Television Network where a Qawali was played during the staged ceremony of Veena Malik’s marriage on morning show at Geo Entertainment.

Moreover, accepting the mistake, the host of Geo’s morning show Dr Shaista Lodhi said “We are ashamed on this unintentional mistake and seek forgiveness from the Allah.”

If you like our post or have any suggestion or got stuck at any steps implementing the widget to your blog then leave a comment below i will be glad to help you out. Subscribe to our blog, Like us on Facebook, +1 on Google+. Keep Blogging!

Sunday, 11 May 2014

Silver Mag Pro Responsive News/Magazine WordPress Theme

Silver Mag Pro Responsive News/Magazine WordPress Theme

Silver Mag Pro Responsive News/Magazine WordPress Theme
You will ne’er get a subject matter with choked with options like this in a very LOW PRICE!!!

Silver magazine may be a minimalistic however Advanced Responsive Magazine vogue WordPress Theme. Silver magazine is Premium WordPress theme,  still it’s yet again free freed from price  for all Themepacific WordPress users.

It is a multi-purpose free WordPress theme. This theme will be used for News/Editorial sites, Technology Magazine blogs etc.

Silver magazine comes with three columns, unlimited homepage Magazine vogue Widgetized sections. Theme has go with WP Nav menus, Widgetized sidebars and fashionable Widgets as well as trendy social Icons contrivance.

You can use this theme with four completely different designs.

Magazine with ancient journal vogue
Magazine vogue solely
ancient journal vogue solely
Grid journal vogue solely

It is a multi-purpose free WordPress theme. This theme will be used for News/Editorial sites, Technology Magazine blogs etc.

Visit DEMO

Download Link’s


If you like our post or have any suggestion or got stuck at any steps implementing the widget to your blog then leave a comment below i will be glad to help you out. Subscribe to our blog, Like us on Facebook, +1 on Google+. Keep Blogging!

Sunday, 4 May 2014

Warid launch 4G LTE services with PTA approval


ISLAMABAD : The Pakistan Telecommunication Authority ( PTA ) received a request to allow Warid Telecom to launch 4G services in the country .

The PTA has held auctions for 3G and 4G network license on 23 April - a process which does not participate in. Warid offer from Pakistan's four mobile operators to qualify for the auction of 3G and 4G are Mobilink , Telenor , Ufone and Zong .

Warid already obtain the spectrum that will enable the roll - out of 4G . Existing license company acquired in 2004 , also technology neutral .

While Warid plans to launch 4G LTE (long - term evolution ) to compete with the 3G/4G license holders , PTA has insisted that the companies need permission from the regulator to the introduction of new services .

Previously , it was estimated that the PTA can hold Warid request for permission to go to the launch of 4G ( LTE ) cellular companies considering the interests of others who buy ( 3G/4G ) licenses for $ 1.12 billion .

Zong and other mobile companies have a serious objection against this decision with the PTA , because they paid heavily for the bid and also invest their time .

Reacting to the announcement , Zong held a press conference and condemned the decision of the PTA . While Zong will require at least one year to offer a complete array of new services to customers , Warid could be easily launched its services in a few months after PTA permission .

If you like our post or have any suggestion or got stuck at any steps implementing the widget to your blog then leave a comment below i will be glad to help you out. Subscribe to our blog, Like us on Facebook, +1 on Google+. Keep Blogging!

Friday, 7 March 2014

Twenty20 World Cup 2014 Schedule

Twenty20 World Cup 2014 Schedule

T20 World Cup 2014 Schedule

If you like our post or have any suggestion or got stuck at any steps implementing the widget to your blog then leave a comment below i will be glad to help you out. Subscribe to our blog, Like us on Facebook, +1 on Google+. Keep Blogging!

Wednesday, 26 February 2014

Joomla India Hacked By AnonGhost

Joomla India Hacked By AnonGhost

ScreenShot


Domains:

http://www.joomla.in
Mirror: http://www.zone-h.org/mirror/id/21856883
If you like our post or have any suggestion or got stuck at any steps implementing the widget to your blog then leave a comment below i will be glad to help you out. Subscribe to our blog, Like us on Facebook, +1 on Google+. Keep Blogging!

Facebook shuts down @facebook.com email service

Facebook founder Mark Zuckerberg announced the launch of email in 2010.
Facebook shuts down @facebook.com email service after the company admitted that ‘most people’ have not been using the product.

Facebook launched it’s email service at the end of 2010.  As part of that new system, every Facebook user got an @facebook.com email address.

Now @facebook.com Mail users are getting a notification letting them know that the service is shutting down and will be forwarding their emails to the primary provided email address on their accounts.
Potential problem: Sending an email to someone’s @facebook.com email account will forward that email straight to their main email inbox (which is used as primary email for their facebook profiles), this could potentially be a huge hit for spammers as they can guess your Facebook email just by looking at your public Facebook username.
If you like our post or have any suggestion or got stuck at any steps implementing the widget to your blog then leave a comment below i will be glad to help you out. Subscribe to our blog, Like us on Facebook, +1 on Google+. Keep Blogging!

Tuesday, 28 January 2014

TeaM Madleets got Hacked by ZHC (ZCompany Hacking Crew)


The biggest news for Pakistani users and hackers.Madleets got hacked by ZHC. Due to some personal reasons they hack madleets. Yeah its a true statement that every DOG his day and today is Madleets day. :D

ScreenShot


Domains:


  • http://b0x1.madleets.com/index.html
  • http://b0x2.madleets.com/index.html

If you like our post or have any suggestion or got stuck at any steps implementing the widget to your blog then leave a comment below i will be glad to help you out. Subscribe to our blog, Like us on Facebook, +1 on Google+. Keep Blogging!

Thursday, 23 January 2014

How to Make Text/Walk In Blog Posts


When we watch a TV news program other television stations, we often find some important news text that is displayed in the form of running. The text that runs it is called by the name of Running Text. In the world of Webmaster, Running Text has another term is "Marquee".
By adding a marquee effect on the text, the center of attention of visitors to the text it will be more focused. So for bloggers who want to make an announcement, you should use the marquee effect. 
Adding a marquee effect on a text is not difficult because the HTML code used is very simple:
<marquee> Text Here ... </ marquee>

Marquee Demo


The text runs to the left
Welcome to tutorialblogspot.com
Walk to the right text
Happy blogging for all of Indonesians bloggers
Text goes up
This is the best site to learn about blogs
Text goes down
How to make moving text in blogs
Text goes back and forth (to the left and to the right)
Get tips computer tricks here
Zig-Zag running text
Zig Zag Walk Text Posts

1. The text runs to the left
<marquee> Text here ... </ Marquee>
2. Walk to the right text
<marquee direction="right"> Text here ... </ Marquee>
3. Text goes up
<marquee direction="up"> Text here ... </ Marquee>
4. Text goes down
<marquee direction="down"> Text here ... </ Marquee>
5. Text goes back and forth (to the left and to the right)
<marquee behavior="alternate"> Text here ... </ Marquee>
6. Zig-Zag running text
<marquee direction="up" behavior="alternate"> <marquee behavior="alternate"> Text here ... </ Marquee> </ marquee>
Is marquee code above we can customize? Obviously could, marquee above HTML code can be adapted to the style or desire of bloggers. Consider the example below! 

1. Text stop when directed Cursor
Code: onMouseOver = "this.stop ()" onMouseOut = "this.start ()" Example application code: <marquee onMouseOver = "this.stop ()" onMouseOut = "this.start ()" > Text here ... </ Marquee>
2. Adding Background in running text
Code: bgcolor = "blue" (Blue is the color code, can be replaced with a favorite color pal) Examples of the application of the code: <marquee bgcolor = "Blue" > Text here ... </ Marquee>
3. Set the text speed run
Code: scrollamount = "2" (figure 2 is the speed of running text, please adjustable) Example application code: <marquee scrollamount = "2" > Text here ... </Marquee>
4. Set the width of the text runs
Code: width = "300" (Set own width. If bloggers want to set too high, just replace the word bloggers width becomes hight) Examples of the application of the code: <marquee width = "300" > Text here ... </Marquee>

Marquee text or text runs can also be applied to the widget. You can simply put the widget code BETWEEN marquee code.

If you like our post or have any suggestion or got stuck at any steps implementing the widget to your blog then leave a comment below i will be glad to help you out. Subscribe to our blog, Like us on Facebook, +1 on Google+. Keep Blogging!

Upload Files and Download in Blogger

Upload Files For Download in Blogger

Blogger is one of the best blogging CMS (Content Management System) which is being used all over the universe. The main feature of this platform is that it is free of hosting which means we just need to purchase domain only without hosting if domain is required otherwise we can also use free sub-domain. Well, when we create blog post, sometimes we need to upload data/files for public download or which can be downloaded into blog reader’s system. But unfortunately, there is no option to upload files that can be due to free hosting and also for avoiding people from uploading unnecessary, spam and malware data in Google servers. So, sometimes people get confused where to upload files for download now and you can be one of that confused people. Don’t worry, we’re here, below we’ll be showing you that how can we easily upload files for Download in Blogger.

So, How can we upload files for download in Blogger?


So, There is no option to upload files for direct download in blogger and still we're eager for it. When we don't have any needable option in Blogger, we can make use of external services. It means if we can't upload files directly from Blogger then we can upload data somewhere else and insert the direct download link in Blogger post editor. Here, we'll make use of Google Drive which is awesome cloud hosting and file sharing service. First, we'll add data into our Google Drive account after that we've to make the data public because everything that you upload in Google Drive is private means only for you but here we want to make it for public download. After storing data in Google Drive and making it public, It's time to insert the download link or download button in blogger and let your visitors download the files.
Let's Try It - Tutorial


  • Go To Google Drive >> Create >> Folder
  • Name It Something Such As "Downloads"
  • Open That Folder >> Click "Upload Icon" and Choose "Files".
Upload FIles


  • Now Select The Files That You Want To Upload.
  • When The File is Uploaded, Right Click On That File.
  • Click "Share" and Once Again "Share".
Sharing File

  • Now Pop Up Box Will  Appear.
  • In The "Who Has Access" Section, Click "Change".
  • Here Just Tick Mark "Public On The Web" and Save It.
Public On The Web and Save
  • Now Same Box Will Appear Back and At The Top, There Will Be Link in "Link To Share" Box. Copy That Link and Paste It in Notepad.
  • Copy This Green Colored Link and Also Paste It in Notepad https://docs.google.com/uc?export=download&id=FILE-ID-GOES-HERE
  • Now Look In The First Link Which You Copied From Google Drive. It Will Be Having File ID Which Looks Like 0ByNodV_m9cVLN1loc2JXZGJQUjQ
  • Copy Yours File ID and Replace It With FILE-ID-GOES-HERE in The Second Link Which You Copied From Here.
  • Now The Second Link Will Look Like This https://docs.google.com/uc?export=download&id=0ByNodV_m9cVLYTRKbjVIYXEwVXM
  • Download Link Is Ready Now! Whenever People Will Open The Link Like Above The File Will Start Downloading and Yes It is Direct Download Link.
  • For Clarification, We've Prepared The Image Inserted Below.
Changing Link

  • Go To Blogger >> Create New Post >> Link
  • Paste The Prepared Link in URL Box, Write "Download" in "Texts to Display" Box.

Edit Link Box Blogger

  • Click "OK"
  • Prepare The Post.
  • Click on "Publish" Button.
  • Thats All.
  • Final Words

Final Words

Thats how we can upload files for download in blogger. Unlike other file sharing services which are lazy, Google Drive is best, fast and reliable that's why we've chosen it. I think tutorial is become little long but we've tried to make it understandable. Feel free to ask for help in comments if you're facing any problem while trying this trick. Share this post with your fellow bloggers and also ask them to share with others. Good bye, Take care and have a nice day!


If you like our post or have any suggestion or got stuck at any steps implementing the widget to your blog then leave a comment below i will be glad to help you out. Subscribe to our blog, Like us on Facebook, +1 on Google+. Keep Blogging!

Monday, 20 January 2014

How to Backup Blogger Templates

Backing up the template , it is important in the affairs of blogging, but many are ignoring it. Backing up templates will greatly help us when we do edit or make changes to your blog and it also occurs when an error on our own blogs, so we have a copy of the template that is good or not to have damage to the script no error occurs even if later we've tried anticipate.
Backing template is absolutely necessary before we make any changes or bereksperiment on our blog, or we can create a new blog specifically for the trial if it does not want to do the backup template.

1. Please log in to Blogger
2. Click Arrow >> then click Template 


3. Find and click the button "Backpup / Restore" (upper right side)

4. In the new window that appears Click the "Download Full Template"


5. Download the template and save it on your computer and click "Close"


Maybe one day you need the results of the backup template so save your blogger template. Very easy way is not? so do not let this be missed if ever need to edit or make changes to scripts on your template.
If you like our post or have any suggestion or got stuck at any steps implementing the widget to your blog then leave a comment below i will be glad to help you out. Subscribe to our blog, Like us on Facebook, +1 on Google+. Keep Blogging!

Sunday, 19 January 2014

Turn Your Computer Into a WiFi Router For Free


Connectify is a software which can turn your PC into a Wi-Fi hotspot and share Internet with all your devices.

You can download this software from their official website : www.connectify.me

Steps To Use : 


  1. Download Connectify  
  2. Install the software
  3. The installation is simple and sweet and begins the wizard for the setup of a device
  4. You can set up a ssid name for the wifi hotspot
  5. Choose a wep password
  6. Click the start hotspot button
  7. Switch on the wifi adapter on your laptop
  8. Enable wifi on your device and then voila!! See the amazing wifi connection on your phone.